There are many reasons why your HID conversion kit may not be working correctly, or as good as you want it to, so I want to give you some solid steps to take to identify what’s wrong with your kit. The reality is all HID conversion kits have a possibility to fail, mostly due to the high number of components. A bad HID bulb could be caused by a defective gas chamber, a problem with the wiring, or a broken electrode. A bad HID ballast could be caused by defective wiring or any one of 50 components inside:
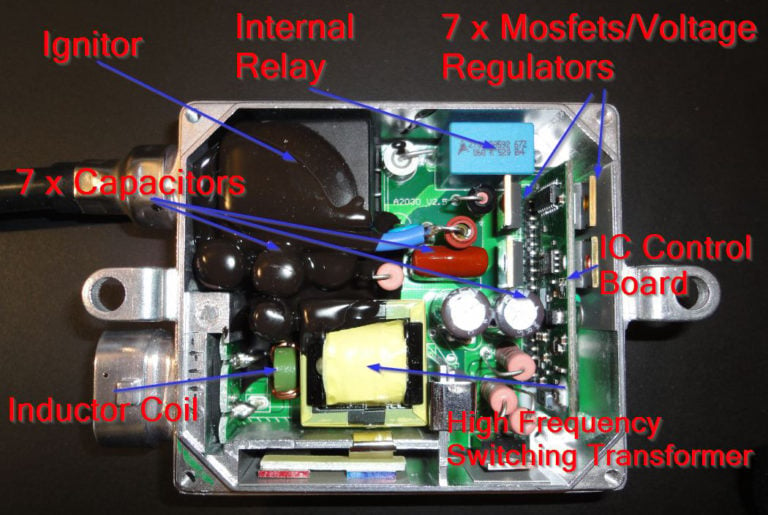
There can be upwards of 60+ individual components that make up the internal workings of an HID ballast. This means you have many failure points and it’s important to be buying high-quality components to have the best defense against failures.
Just because it acts like a bulb, doesn’t necessarily mean it’s a bulb…
Just because your HID kit is flickering, or you have to turn it on and off 10 times before it will start doesn’t necessarily mean it’s a bad bulb, or a bad ballast, or bad wiring… The reality is that pretty much all HID system issues have the same or similar symptoms. Heck, you can even have different colored bulbs and the issue could be the ballast! If one ballast is running at 26 watts and the other is running at 35 watts, it will change the bulb color. It’s important to do the below troubleshooting to rule out where the ACTUAL issue lies.
Process of Elimination:
The only sure-fire way to decide which component is defective is to swap parts around and see if the issue you’re having “follows” one item.
- Check connections! There are literally between 24 – 50 wire connections involved in your HID conversion kit depending on if you’re using a relay harness, resistors, or some other integration component. Tug on EACH AND EVERY wire, behind the connector to see if they are loose. Also, visually inspect for corrosion or damage. This is an often overlooked yet crucial part of your troubleshooting because you might misdiagnose a loose connector as being a bad bulb.
- Swap Ballasts Left – to – Right. The HID ballast is usually the easiest part of your HID kit to get access to, so unplug them and swap them around from side to side. If the problem you’re having “follows” the ballast, then it’s a bad ballast.
- Swap Bulbs Left – to – Right. If swapping your ballasts around doesn’t fix anything, next try swapping the bulbs. Swap them around side to side and see if the problem follows the bulb.
- If you can’t identify which component is giving you issues by swapping parts, then take out the HID system and try installing the original halogen bulbs. Your problem very well maybe something on the vehicle side like the factory wiring or the fuses. If you plug in the original bulb and THAT doesn’t work either, then it’s time to investigate your fuses that control that headlight or inspect the wiring more closely for problems.
Brown Bulbs:
If you’ve ever taken out your HID bulbs to visually inspect them to see if they are broken or defective you might have noticed some discoloration in one or both. The little glass ball inside the bulb tube holds a mixture of gasses and metal halide salts specifically xenon gas, mercury, fluoride, chloride, and more. Sometimes a bad bulb can look dark or brown inside that little ball. Sometimes a bad bulb can look perfectly clear! Don’t let the look of your bulb give off any false positives in your diagnosis. Perform the process of elimination testing with known good components to test if your bulbs are bad.
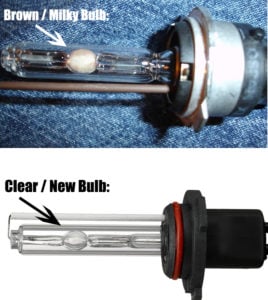
Just because your HID bulb is brown, milky, or discolored does not automatically it’s broken or defective. A dark-colored ball inside the bulb may be perfectly normal. You still need to test your bulbs with known good components to determine if they are faulty or not.


.png?width=300&height=87&name=logo%20(1).png)