

Upgrading the headlights on your 2014–2016 Tundra dramatically improves visibility. However, this truck uses a tight engine bay layout, so access requires patience and planning.
Whether you choose HID or LED, the basic removal process stays the same. Below, we’ll walk through both options clearly and safely.
Know Your Factory Setup
Toyota Tundra 2014–2016 models typically use:
-
H11 for low beam
-
9005 for high beam
Before ordering parts, confirm your bulb size using your owner’s manual.
Additionally, decide which upgrade you want:
-
LED bulbs → Easier install, lower heat
-
HID kits → Higher intensity, requires ballasts
Both work. However, installation differs slightly.
Step 1: Gain Access to the Headlight Bulbs


First, open the hood.
For the driver side, you may need to loosen the battery bracket.
For the passenger side, you may need to move the air intake snorkel.
Alternatively, some installers access the bulbs through the wheel well liner. Removing a few clips gives you more room to reach the back of the housing.
Next, remove the rubber dust cap from the rear of the headlight housing.
Then, disconnect the factory bulb connector.
Finally, twist the halogen bulb counterclockwise and pull it out.
Step 2: Installing LED Headlight Bulbs
LED bulbs offer the simplest upgrade path.
Install Process:
-
Insert the LED bulb into the housing.
-
Align the tabs properly.
-
Twist clockwise until fully seated.
-
Connect the factory plug to the LED driver harness.
If the LED does not turn on during testing, flip the connector 180 degrees. Polarity matters.
After confirming function, reinstall the dust cap. Some larger LED heat sinks may require trimming the dust cover or using an extended cap.
Because LEDs generate less heat than HID systems, you don’t need ballasts or relay harnesses in most cases.
Step 3: Installing HID Headlight Kits

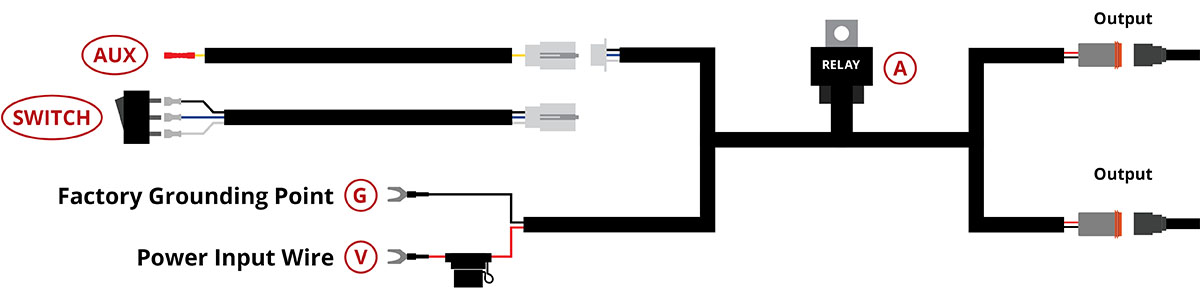

HID kits require additional components.
Mount the Ballasts
First, find a solid metal surface away from engine heat. Then secure each ballast with bolts or heavy-duty brackets.
Avoid mounting near moving parts.
Install the HID Bulbs
Next, insert the HID bulb into the housing just like the halogen bulb. Make sure it locks firmly into place.
Wire the System
Now connect:
-
Factory headlight plug → HID harness input
-
Ballast output → HID bulb
-
Battery positive (if using relay harness)
-
Chassis ground
If your Tundra flickers at startup, install a relay harness. This setup pulls stable voltage directly from the battery.
Check for CANBUS or Flicker Issues
Most 2014–2016 Tundras handle LED and HID upgrades well. However, some trims may show flickering or bulb-out warnings.
If that happens:
-
Install a CANBUS module
-
Use a relay harness
-
Check all ground points
Proper grounding solves many issues immediately.
Final Testing
After installation:
-
Test low beam.
-
Test high beam.
-
Start the engine.
-
Verify no flicker or warning lights appear.
Then secure all wiring and reinstall any removed components.
Final Thoughts
Upgrading your 2014–2016 Tundra headlights improves clarity and modernizes the front end. LEDs provide a simple, low-maintenance option. Meanwhile, HID kits offer higher peak intensity but require more wiring.
Take your time during installation. Secure everything properly. Double-check polarity and grounds.
Once finished, you’ll enjoy brighter, whiter light every time you drive.
If you’re into high-performance lighting upgrades, make sure to follow our Facebook page for the latest installs, comparisons, and product releases. For in-depth guides, expert insights, and real-world testing, check out the Better Automotive Lighting Blog— your go-to source for serious illumination upgrades. Up Next: Upgrade Your BulbsMeet the people behind Better Automotive Lighting

John Tobias, Headlight Junkie and Industry Veteran
Before managing pricing and product categories for the DLG brands, John worked directly with customers in customer service and tech support, then spent several years in marketing creating content like this and the videos published online. Today he takes more than ten years of aftermarket automotive lighting experience to events all over the USA, meeting customers and talking to real people about what they care about. He is focused on understanding the market, the trends, the big players, and what matters to lighting enthusiasts. John has tested thousands of lights, works directly with lighting engineers to evaluate the technical performance behind every recommendation, and is one of the foremost experts on everything happening in the world of aftermarket automotive lighting. LinkedIn


